Homemade Dog Cake Recipe: Chicken, Cheese & Strawberry
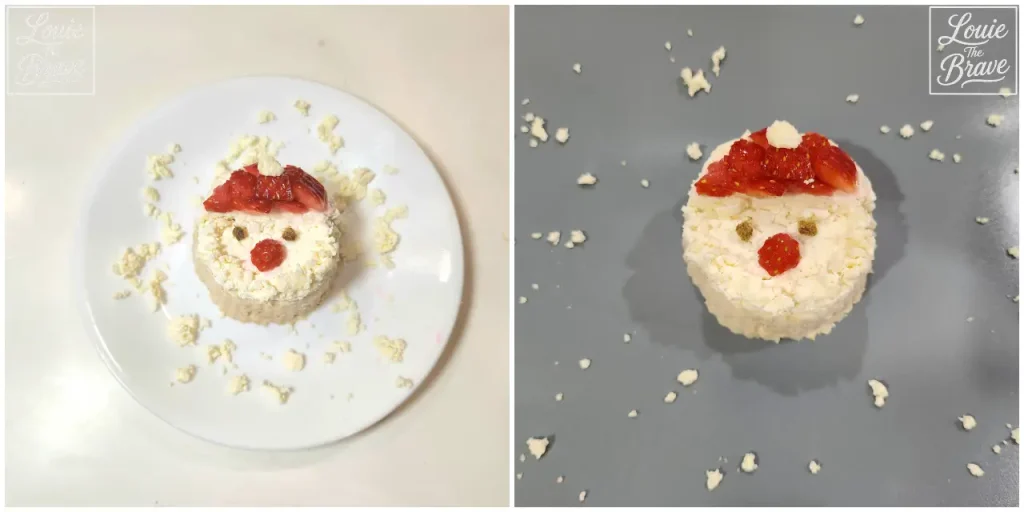
This flourless homemade dog cake recipe uses a baked chicken breast base, fresh cheese made from lactose-free low-fat milk, and strawberry for a simple red-and-white decoration. I made the original Santa-style version for Louie’s second Christmas, when he weighed 3.04 kg, or about 6.7 lb.
The cake is best treated as an occasional extra rather than a nutritionally complete meal for every dog. A cake made from chicken, dairy, and fruit does not automatically provide all of the nutrients a dog needs for a full meal. VCA Animal Hospitals and the World Small Animal Veterinary Association use a general guideline that treats and other extras should stay within about 10% of a dog’s daily calories, while most calories should come from a complete and balanced diet. The appropriate amount still depends on the individual dog’s calorie needs, body condition, health, and regular food.
Why This Homemade Dog Cake Recipe Is a Treat, Not a Meal
This homemade dog cake recipe is intentionally simple, but simple ingredients do not make it a complete and balanced diet. Use it as a celebration treat unless your dog’s overall diet has been formulated for meal replacement.
That distinction matters especially with a small dog. A miniature cake that looks tiny on a human plate can still represent a noticeable part of a toy breed’s daily food intake.
Ingredients for This Chicken Dog Cake
| Ingredient | Amount | How it is used |
|---|---|---|
| Skinless chicken breast | 150 g / 5.3 oz | Cake base |
| Lactose-free low-fat milk | 500 mL / about 2 cups | Fresh cheese topping |
| Plain white vinegar | 2 Tbsp | To separate the milk curds |
| Strawberry | 1 small berry | Santa hat, nose, and red decoration |
| Dog treat pieces | A few tiny pieces | Optional eyes |
| Extra fresh cheese crumbles | As needed | Beard, hat trim, and “snow” |
Use plain ingredients without salt, sugar, garlic, onion, sauces, or seasoning. If your dog has not eaten dairy or strawberry before, introduce those foods separately in small amounts instead of trying several new ingredients at once.
1. Prepare the Chicken Without Rinsing It
The original version I made included a vinegar soak and rinse, but I would skip that step when preparing this version.
The USDA advises against washing or rinsing raw poultry because splashing can spread bacteria to sinks, counters, utensils, and nearby foods. Rinsing or soaking chicken is not necessary to make it safe; thorough cooking is the important food-safety step.
Trim away visible fat, connective tissue, and tough membrane. Finely mince the chicken breast with a knife or pulse it briefly in a food processor.
The meat should become sticky enough to hold together when pressed into a small muffin cup or mini cake mold.
2. Bake the Chicken Base
Preheat the oven to 350°F, about 175–180°C.
Press the minced chicken into a small muffin cup or round oven-safe mold to a depth of a little over 3/4 inch, or roughly 2 cm. Smooth the surface lightly. It does not need to be perfect because the top can be trimmed later.
Bake until the center reaches 165°F (73.9°C) on a food thermometer. USDA lists 165°F as the safe minimum internal temperature for poultry.
My original small cake base took about 20 minutes, but cooking time can change with the thickness of the cake, the pan, and the oven. Use the internal temperature rather than time alone to decide when it is finished.
Chicken will shrink as it cooks and release liquid. Carefully pour away the liquid, let the cake base cool, and refrigerate it while preparing the topping.
3. Make Fresh Lactose-Free Cheese
Pour 500 mL of lactose-free low-fat milk into a saucepan.
Heat it over medium heat while stirring so the bottom does not scorch. When the milk reaches a strong simmer and begins to rise, add the vinegar and stir gently.
The milk should begin separating into white curds and translucent whey.
Set a fine-mesh strainer over a bowl and line it with clean cheesecloth. Pour the mixture through the cloth, gather the curds together, and allow the whey to drain.
Gently press the curds beneath a small plate or bowl, then refrigerate them briefly. Chilling makes the fresh cheese easier to shape around the chicken cake.
The 500 mL of milk produced much more cheese than I needed for Louie’s mini cake—roughly 2.5 times the amount I used for the decoration.
Lactose-free milk may be easier for some dogs to digest than regular milk, but it is still dairy. Dogs vary in dairy tolerance, and milk can cause gas, loose stool, vomiting, abdominal discomfort, or diarrhea in dogs that do not tolerate it well.
I also use lactose-free milk in another recipe for homemade dog jelly treats with milk and carob, where dairy tolerance and portioning are covered in more detail.
If your dog has already reacted poorly to milk or cheese, choose a different cake topping.
4. Prepare the Strawberry Decoration
Wash one strawberry under running water and remove the leafy top.
Cut a small rounded piece for Santa’s nose. Finely chop part of the red strawberry flesh for the hat.
For Louie’s cake, I used only about half of the chopped strawberry. I left some of the pale center out because I wanted the decoration to look redder, not because the inside of a strawberry is unsafe.
Most dogs can eat strawberries in moderation when they are washed, the leaves and stem are removed, and the fruit is cut into appropriately sized pieces.
Strawberry is only a decoration here, so a small amount is enough.
5. Assemble the Santa Cake
Once the chicken base and fresh cheese are completely cool, trim the top of the chicken if needed.
My muffin mold was wider at the top, so I turned the chicken base upside down. That gave the finished cake a more stable shape.
Press fresh cheese over the top and sides. There is no need to make it perfectly smooth like human cake frosting.
Add the chopped strawberry across the top for Santa’s red hat. Place the small rounded strawberry piece in the center for the nose.
For Louie’s cake, I used two tiny pieces of one of his existing treats for the eyes.
Crumble more fresh cheese around the lower part of the face for Santa’s beard. Add a small cheese ball at the end of the hat and scatter a few cheese crumbs around the plate to look like snow.
That decoration makes this homemade dog cake recipe especially easy to use at Christmas, but the same chicken-and-cheese base can also become a birthday or gotcha-day cake.
How Much Dog Cake Should You Serve?
There is no universal “one slice” serving size for a dog cake.
The same mini cake represents a very different share of daily calories for a 7-pound Yorkie and a 60-pound dog.
When I made this recipe, Louie weighed 3.04 kg, about 6.7 lb, and I planned the amount around more than one feeding. His portion should not be copied as a formula for another dog.
If you serve the cake as a treat, count the chicken, fresh cheese, strawberry, and any decorative treats together with the other extras your dog eats that day. Treat calories can add up quickly in a small dog.
If you want homemade food to replace a regular meal or become part of your dog’s main diet, portion size is only one part of the calculation. A main diet also needs the necessary vitamins, minerals, fatty acids, amino acids, and appropriate nutrient proportions.
My guide to calculating daily homemade dog food amounts and individual meal sizes explains that difference in more detail.
Dogs eating a prescription diet, dogs with pancreatitis or another condition requiring controlled fat, and dogs with known food allergies may need different treat choices. VCA notes that treats that are appropriate for one dog may not fit a veterinary diet or a medical nutrition plan.
Storage and Serving
Keep the finished cake refrigerated because it contains cooked chicken, fresh dairy curds, and cut fruit.
Refrigerate it promptly after preparation and return unused portions to the refrigerator soon after serving.
USDA general guidance recommends using refrigerated cooked leftovers within about three to four days.
Because this cake combines several fresh, perishable ingredients, I prefer making only a small amount that will be used quickly. Discard it sooner if the smell, color, or texture changes.
For a small dog, break the cake into manageable bites instead of allowing an excited dog to gulp a large piece.
Louie’s Christmas Cake
Louie’s second Christmas was the first year I made him his own little celebration cake.
I wanted his cake to resemble the strawberry cake the rest of the family was eating, so the red strawberry hat and white fresh cheese became a tiny Santa face.
The fresh cheese was much more rustic than bakery frosting, and getting a good photo before Louie ate it was another challenge. He clearly thought the cake belonged to him and was not interested in waiting through a long Christmas photo session.
Once he finally got to eat it, he ate very neatly. Later, he spent a long time rolling around happily on the sofa in his usual little “worm dance.”
For me, the best part of this homemade dog cake recipe is that it looks festive without requiring sugar, commercial frosting, food coloring, or complicated baking.
The chicken base provides the shape, fresh lactose-free cheese creates the white Santa face, and a little strawberry adds the Christmas color. Keep the portion appropriate for your own dog, and the same simple method can turn a few familiar ingredients into a special-occasion treat.
Source
- World Small Animal Veterinary Association — Feeding Treats to Your Dog WSAVA feeding treats guidance
- VCA Animal Hospitals — Dog Treats VCA guidance on treats and daily calories
- USDA Food Safety and Inspection Service — Should I Wash Chicken or Other Poultry Before Cooking? USDA poultry washing guidance
- USDA Food Safety and Inspection Service — To What Internal Temperature Should I Cook Poultry? USDA poultry cooking temperature guidance
- American Kennel Club — Can Dogs Drink Milk? Is Milk Bad for Dogs? AKC guidance on dogs and milk
- PetMD — Can Dogs Eat Strawberries? PetMD strawberry feeding guidance